This technical white paper was written and submitted by by Jim Bible of Dimensional Gauge Co., Inman, SC.
Jim Bible has been in the Granite Surface Plate Calibration and repair business for 39 years! Dimensional Gauge Company was the very first dedicated dimensional gauging sales and repair in South Carolina. Dimensional Gauge was the first company in the US to achieve ISO Guide 25 accreditation in surface plate calibration, then upgrading to ISO/IEC-17025 accreditation in 2003. And in 2018 we were the first in the nation to be assessed to the new ISO/IEC 17025:2017 standard and the first in the Southeast to achieve it! DGI Metrology became a part of the new company name to reflect its expansion into other calibration services. DGI’s primary customer base is Aerospace, Energy, Military, and Automotive.
The Early History of Granite Surface Plates
Before World War II, Manufacturers used Steel Surface Plates for the dimensional inspection of parts. During World War II the need for steel increased dramatically, and a lot of Steel Surface Plates were melted down. A replacement was needed, and Granite became the material of choice because of its superior metrological properties.
Several advantages of granite over steel became evident. Granite is harder, although more brittle and subject to chipping. You can lap Granite to much greater flatness and faster than steel. Granite also has the desirable property of a lower thermal expansion compared to steel. Further, if a steel plate needed repair, it had to be hand scraped by artisans who also applied their skills in machine tool rebuild.
As a side note, some Steel Surface Plates are still in use today.
Metrological Properties of Granite Plates
Granite is an igneous rock formed by volcanic eruptions. By comparison, marble is metamorphosed limestone. For metrology use, the granite selected should meet specific requirements outlined in Federal Specification GGG-P-463c, from now on called Fed Specs, and specifically, Part 3.1 3.1 Among the Fed Specs, granite should be a fine to medium-grained texture.
Granite is a hard material, but its hardness varies for several reasons. An experienced granite plate technician can estimate the hardness by its color which is an indication of its quartz content. Granite hardness is a property defined in part by the amount of quartz content and lack of mica. The red and pink granites tend to be the hardest, the grays are medium hardness, and the blacks are the softest.
Young’s Modulus of Elasticity is used to express the flexibility or indication of the hardness of the stone. Pink granite averages 3-5 points on the scale, grays 5-7 points and blacks 7-10 points. The smaller the number, the harder the granite tends to be. The larger the number, the softer and more flexible granite is. It is important to know the hardness of Granite when choosing a thickness required for tolerance grades and the weight of parts and gauges placed upon it.
In the old days when there were real machinists, known by their trig table booklets in their shirt pockets, black granite was considered to be “The Best.” The Best defined as the type that gave the most resistance to wear or is harder. One drawback is that the harder granites tend to chip or ding easier. Machinists were so convinced that black granite was the best that some manufacturers of pink granite dyed them black.
I have personally witnessed a plate that was dropped off a forklift when moved from storage. The plate hit the floor and split in two revealing the true pink color. Use caution if planning a purchase of black granite out of China. We recommend you waste your money in some other way. A granite plate can vary in hardness within itself. A streak of quartz can be much harder than the rest of the surface plate. A layer of black gabbro can make an area much softer. A well trained, experienced surface plate repair techs know how to handle these soft areas.
Surface Plate Grades
There are four grades of surface plates. Laboratory grade AA and A, Room Inspection Grade B, and the fourth is Workshop Grade. Grade’s AA and A are the flattest with a flatness tolerances better than 0.00001 in for a Grade AA plate. Workshop Grades being the least flat and as the name suggests, they are intended for use in tool rooms. Where as Grade AA, Grade A and Grade B are intended for use in an inspection or quality control lab.
Proper Testing For Surface Plate Calibration
I have always told my customers that I can pull any 10-year-old out of my church and teach them in just a few days how to test a plate. It is not hard. It does require some technique to perform the task quickly, techniques that one learns through time and much repetition. I should inform you, and I cannot emphasize enough, Fed Spec GGG-P-463c IS NOT a calibration procedure! More on that later.
Calibration of overall flatness (Mean Pane) and Repeatability (localized wear) checks is a must According to the Fed Specs. The only exception to this is with small plates where repeatability is only required.
Also, and just as critical as the other tests, is the test for thermal gradients. (See Delta T below)
Figure 1
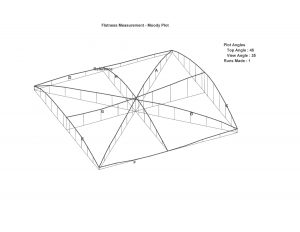
Flatness Testing has 4 approved methods. Electronic levels, autocollimation, laser and a device known as a plane locator. We at Dimensional Gauge Company only use electronic levels because they are the most accurate and fastest method for several reasons.
Lasers and autocollimators use a very straight beam of light as a reference. One makes a straightness measurement of a granite surface plate by comparing the variation in distance between the surface plate and the light beam. By taking a straight beam of light, striking it onto a reflector target while moving the reflector target down the surface plate, the distance between the emitted beam and the return beam is a straightness measurement.
Here’s the problem with this method. The target and the source are affected by vibration, ambient temperature, a less than flat or scratched target, contamination in the air, and air movement (currents). All these contribute additional components of error. Furthermore, the contribution of operator error from checks with an autocollimator is greater.
An experienced autocollimator user can make very accurate measurements but still faces problems with consistency of the readings especially over longer distances as the reflections tend to widen or become slightly blurred. Also, a less than perfectly flat target and a long day of peering through the lens produces additional errors.
A plane locator device is just silly. This device uses a somewhat straight (as compared to an extremely straight collimated or laser beam of light) as its reference. Not only does the mechanical device use an indicator normally of only 20 u Inch resolution but the un-straightness of the bar and dissimilar materials add significantly to errors in measurement. In our opinion, although the method is acceptable, no competent lab would ever use a plane locating device as a final inspection instrument.
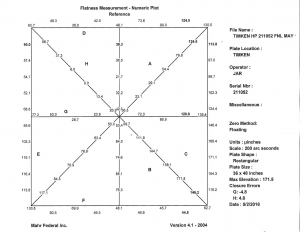
Electronic levels use gravity as their reference. Differential electronic levels are not affected by vibration. They have a resolution as low as .1 arc second and measurements are fast, accurate and there is very little contribution of error from an experienced operator. Neither Plane Locators nor autocollimators provide computer-generated topographical (Figure 1) or isometric plots (Figure 2) of the surface.
Figure 2
A Proper Flatness of the Surface Test
A proper flatness of the surface test is such an important part of this paper I should have placed it at the beginning. As stated earlier, Fed Spec. GGG-p-463c IS NOT a calibration method. It serves as a guide for many aspects of metrology grade granite whose intended buyer is any Federal Government Agency, and that includes the methods of testing and tolerances or grades. If a contractor claims they adhered to Fed Specs, then the flatness value shall be determined by the Moody Method.
Moody was a fellow from way back in the 50’s who devised a mathematical method to determine overall flatness and account for the orientation of lines tested, whether they be sufficiently close in the same plane. Nothing has changed. Allied Signal tried to improve on the mathematical method but concluded that the differences were so small it was not worth the effort.
If a surface plate contractor uses Electronic Levels or laser, he uses a computer to assist him with the computations. Without computer assist the technician using autocollimation must calculate the readings by hand. In reality, they do not. It takes too long and frankly may be too challenging. In a flatness test using the Moody Method, the technician tests eight lines in a Union Jack configuration for straightness.
The Moody Method
The Moody Method is a mathematical way to determine if the eight lines are on the same plane. Otherwise, you just have 8 straight lines that may or may not be on or near the same plane. Further, a contractor claiming to adherence to Fed Spec, and uses autocollimation, he must generate eight pages of data. One page for each line checked to prove his testing, repairing, or both. Otherwise, the contractor has no idea what the real flatness value is.
I am certain if you are one of those that get your plates calibrated by a contractor using autocollimation, you have never seen those pages! Figure 3 is a sample of just one page of eight necessary to compute the overall flatness. One indication of that ignorance and malice is if your report has nice rounded numbers. For example, 200, 400, 650, etc. A properly computed value is a real number. For example 325.4 u In. When the contractor uses the Moody Method of computations, and the technician calculates the values manually, you should receive eight pages of computations and an isometric plot. The isometric plot shows the varying heights along the different lines and how much distance separates the selected intersecting points.
Figure 3 (It takes eight pages like this to calculate flatness manually. Be sure to ask why you are not getting this if your contractor uses autocollimation!)
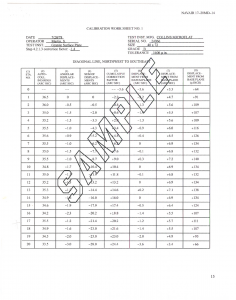
Figure 4
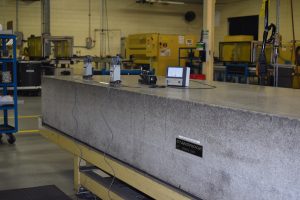
Dimensional Gauge technicians use differential levels (Figure 4) as preferred devices to measure the minute changes in angularity from measurement station to station. The levels have a resolution down to .1 arc seconds (5 u Inches using 4″ sled) are extremely stable, are not affected by vibration, distances measured, air currents, operator fatigue, air contamination or any of the problems inherent in other devices. Add computer assistance, and the task becomes relatively fast, generating topographical and isometric plots proving the verification and most importantly the repair.
A Proper Repeatability Test
Repeat reading or repeatability is the most important test. The equipment we use to perform the repeatability test is a repeat reading fixture, an LVDT and an amplifier necessary for high-resolution readings. We set the LVDT amplifier to a minimum resolution of 10 u Inches or 5 u Inches for high accuracy plates.
Using a mechanical indicator with a resolution of only 20 u Inches is worthless if you are trying to test for a repeatability requirement of 35 u Inches. Indicators have a 40 u Inches uncertainty! The repeat reading setup mimics a height gage/part configuration.
Repeatability IS NOT the same as overall flatness (Mean Plane). I like to think of repeatability in granite viewed as a consistent radius measurement.
Figure 5
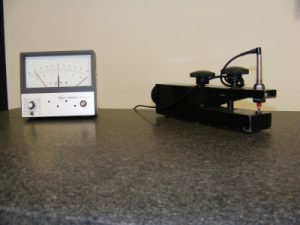
If you test for repeatability of a round ball, then you have demonstrated the ball’s radius has not changed. (The ideal profile of a properly repaired plate has a convex crowned shape.) However, it is evident that the ball is not flat. Well, sort of. On an extremely short distance, it is flat. Since the majority of inspection work involves a height gage very near to the part, repeatability becomes the most critical property of a granite plate. It is more important that the overall flatness unless a user is checking the straightness of a long part.
Make certain that your contractor performs a repeat reading test. A plate can have a repeat reading significantly out of tolerance but still pass a flatness test! Amazingly a lab can get accreditation in testing that does not include a repeat reading test. A lab that cannot repair or is not very good at repairing prefers to perform flatness testing only. Flatness rarely changes unless you move the plate.
Repeat reading testing is the easiest to test but the most difficult to achieve when lapping. Make certain your contractor can restore repeatability without “dishing” the surface or leaving waves in the surface.
Delta T Test
This test involves measuring the ACTUAL temperature of the stone at its top surface and its bottom surface and computing the difference, Delta T, for reporting on the certificate.
It is important to know the average coefficient of thermal expansion in granite is 3.5 uIn/Inch/degree. Ambient temperatures and humidity’s effect on a granite plate is negligible. However, a surface plate can go out of tolerance or sometimes improve even if in a .3 – .5 degree F Delta T. It is necessary to know if the Delta T is within .12 degrees F of where the differential from the last calibration.
It is also important to know that a plates work surface migrates towards heat. If the top temperature is warmer than the bottom, then the top surface rises. If the bottom is warmer, which is rare, then the top surface sinks. It is not enough for a quality manager or technician to know the plate is flat and repeatable at the time of calibration or repair but what it’s Delta T was at the time of final calibration testing. In critical situations a user can, by measuring the Delta T himself, determine if a plate has gone out of tolerance due solely to Delta T variations. Fortunately, granite takes many hours or even days to acclimate to an environment. Minor fluctuations in ambient temperature throughout the day will not effect it. For these reasons, we do not report ambient calibration temperature or humidity because the effects are negligible.
Granite Plate Wear
While granite is harder than steel plates, granite still develops low spots on the surface. Repetitive movement of parts and gages on the surface plate is the greatest source of wear, especially if the same area is constantly in use. Dirt and grinding dust allowed to remain on a plate’s surface speed up the wear process as it gets between parts or gauges and the granite surface. When moving parts and gages across its surface, abrasive dust is usually the cause of additional wear. I highly recommended constant cleaning to reduce wear. We have seen wear by on plates caused by daily UPS package deliveries placed on top of plates! Those localized areas of wear affect the calibration repeatability test readings. Avoid wear by cleaning regularly.
Granite Plate Cleaning
To keep the plate clean, use a tack cloth to remove grit. Just press very lightly, so you do not leave glue residue. A well-used tack cloth does an excellent job of picking up grinding dust between cleaning. Do not work in the same spot. Move your setup around the plate, distributing the wear. It is OK to use alcohol to clean a plate, but be aware that doing so will temporarily super cool the surface. Water with a small amount of soap is excellent. The commercially available cleaners such as Starrett’s cleaner are also excellent to use, but make sure you get all the soap residue off the surface.
Granite Plate Repair
It should be evident by now the importance of making certain your surface plate contractor performs a competent calibration. The “Clearing House” type labs that offer “Do it all with one call” programs rarely have a technician that can do repairs. Even if they do offer repairs, they do not always have a technician that has the experience needed when the surface plate is significantly out of tolerance.
If told a plate can not be repairable because of extreme wear, call us. Most likely we can make the repair.
Our techs work a one to one and a half year apprenticeship under a Master Surface Plate Technician. We define a Master Surface Plate Technician as someone who has completed their apprenticeship and has over ten additional years experience in Surface Plate calibration and Repair. We at Dimensional Gauge have three Master Technicians on staff with over 60 years experience combined. One of our Master Technician is available at all times for support and guidance for when difficult situations arise. All of our technicians have experience in surface plate calibrations of all sizes, from small to very large, varying environmental conditions, different industries, and in major wear problems.
Fed Specs have a specific finish requirement of 16 to 64 Average Arithmetic Roughness (AA). We prefer a finish in the range of 30-35 AA. There is just enough roughness to ensure parts and gages move smoothly and don’t stick or wring to the surface plate.
When we repair we inspect the plate for proper mounting and levelness. We use a dry lapping method, but in cases of extreme wear requiring substantial granite removal, we wet lap. Our technicians clean up after themselves, they are thorough, fast and precise. That is important because the cost of granite plate service includes your downtime and lost production. A competent repair is of paramount importance, and you should never choose a contractor on price or convenience. Some calibration work demands highly trained individuals. We have that.
Final Calibration Reports
For each surface plate repair and calibration, we provide detailed professional reports. Our reports contain a significant amount of both critical and pertinent information. Fed Spec. requires most of the information we provided. Excluding those contained in other quality standards such as ISO/IEC-17025, the minimum Fed. Specs for reports are:
- Size in Ft. (X’ x X’)
- Color
- Style (Refers to no clamp ledges or two or four ledges)
- Estimated Modulus of Elasticity
- Mean Plane Tolerance (Determined by Grade/Size)
- Repeat reading Tolerance (Determined by diagonal length in inches)
- Mean Plane as Found
- Mean Plane as left
- Repeat reading as found
- Repeat reading as left
- Delta T (Temperature differential between top and bottom surfaces)
If the technician needs to carry out lapping or repair work to the surface plate, then the certificate of calibration is accompanied by a topographical or isometric plot to prove a valid repair.
A Word Concerning ISO/IEC-17025 Accreditations and the labs that have them
Just because a lab has accreditation in surface plate calibration does not necessarily mean they know what they are doing much less doing it correctly! Neither does it necessarily imply the lab can repair. The accrediting bodies do not make the distinction between verification or calibration (repair). And I know of one, maybe 2 accrediting bodies that wilL tie A ribbon around my dog if I paid them enough money! It is a sad fact. I have seen labs get accreditation by performing only one of the three tests required. Moreover, I have seen labs get accreditation with unrealistic uncertainties and get accredited without any proof or demonstration how they calculated the values. It is all unfortunate.
Summation
You cannot underestimate the role of precision granite plates. The flat reference that granite plates provide is the foundation upon which you make all other measurements.
You can utilize the most modern, most accurate and most versatile measuring instruments. However, accurate measurements are hard to ascertain if the reference surface is not flat. One time, I had a prospective customer say to me “well it is just rock!” My response, “OK, you are correct, and you definitely cannot justify having experts come in to maintain your surface plates.”
Price is never a good reason to choose surface plate contractors. Buyers, accountants and a disturbing number of quality engineers do not always understand that recertifying granite plates is not like recertifying a micrometer, caliper or a DMM.
Some instruments require expertise, not a low price. After saying that, our rates are very reasonable. Especially for having confidence that we perform the work correctly. We go well beyond ISO-17025 and Federal Specifications requirements in added value.
In 34 years we have never had a customer complain about our Granite Surface Plate Calibration and Repair services. So contact us today to ask how we can give you confidence in your surface plate calibration utilizing our expert abilities.
